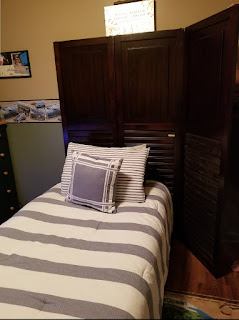
I nabbed a 3-panel room divider with the hopes of finding a new way to repurpose it. One of my sisters was tossing it out and it had a broken louver on it. It also had some pretty good gouges in it but when using a chalk-based paint, that can just add some good character.
After tossing around a few ideas, my youngest son had settled on a new vibe for his room that desperately needed some updating. He had definitely outgrown the army fighter plane theme he had had since he was a toddler. He's almost 14 now. He announced he would like a vacation-type vibe...something that reminds him of our annual family vacations to Florida. We spent months going through various furniture stores and visiting online furniture websites, but it seemed a better option to save a little money and give making one of our own a try and he was all for it.
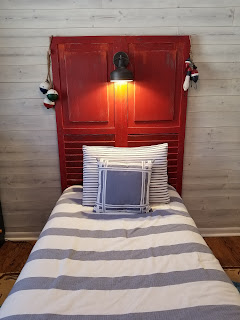
I walked by the room divider in the basement multiple times and decided I would take a stab at utilizing two of the panels as a headboard. Yes, it turns out it is abnormally tall for a standard twin-sized bed headboard, but maybe I could save it yet. After presenting my idea to my Mr Fix It husband, he informed me that we would need to add some support to the back because I seemed to like it better upside down with the louvers on the bottom. I'm so lucky to have him. Sure, he groans when I add to his to-do list, but even he admits he kinda digs it once he gets going creatively trying to bring my visions to life for me. I could somehow picture a boathouse vibe with some distressing so decided to give it a go!
Before
Test Shot Before
I started with roughing up the piece a bit since it had a high sheen
gloss finish. What a mess. I also removed the wooden rung that spanned
across all of the louvers allowing you to open and close them. They
would become permanently stationery once Mr Fix It attached the extra
piece of wood as a support behind the panels.
Roughing Up
I then distressed the entire surface area except for the bits that would be hidden by the actual mattress and then applied clear wax, which beautifully brings out the richness of the colors and allowing the blue and white to show through here and there.
Distressing
Then I turned it over to Mr. Fix It to add the brace/support to the back.
Side view of added bracing panel on back
In this situation, he needed to put on this pretty substantial piece of wood in the back behind the louvered section because the bed rails needed to firstly attach to this beast of a headboard, secondly needed to have additional strength added to it since he would actually be drilling THROUGH some of the louvers where the bed rails are thereby weakening them, and thirdly to keep the two panels stationary after removing the hinges that allowed it to fold.
Having the panels technically upside down would also make them top heavy and we wanted to keep the damage our little Farley (his nickname for his uncanny ability to destroy most anything he touches) to a minimum....we need Foresight with that child and try to predict what could go wrong in advance.
To trick the eye from noticing the obviously abnormally tall headboard, I decided to hunt for a rustic-style boathouse-vibe light fixture that we could attach to it since Farley likes to read. Mr. Fix It came along for his input as to how we could turn any light I settled on into a light that actually plugs in that has an on-and-off switch/button built in. We settled on a light that was initially meant to be wired into a wall and modified it to be a plug-in light fixture.
Voila!
Our little Farley now has a push button built right into the headboard so he can turn the light on and off while lying in bed!
While we were out shopping for the light fixture, I wandered over to the section where they have ship lap and other wooden planks. I found some wooden wall planks on clearance, bought a couple of packs of them and decided to whitewash them with some Annie Sloan Old White Chalk Paint. I added a little water and wiped it on and wiped it off to achieve a more weathered and worn look. I whitewashed prior to installation....and then again after some wood filler was added.
Whitewashed wooden panels
After Mr. Fix It installed all of the planks, I needed to use some wood filler to fill in the nail holes and touch up these spots with more paint.
Installation in Progress
Behold the hole filled in by a man hand compared to my more precise application above that
Mid-application of a light second coat for more coverage and to cover the wood filler marks
And now for the finished product!! Drumroll please!......
I know I need to work in some reds into the bedding and room, but what do you think? Did I pull it off or nah?


